|
The
main webpage of the CarLibrary.org
digital archive project site promotes the use of the open-source
Greenstone digital library program for car historians, collectors,
museums and collections, to encourage the creation of digital archives.
This
webpage describes using
the open-source ExifTool software and a separate open-source
add-on program, the ExifToolGUI (Graphical User Interface), to improve the
identification - and eventual classification - of digital photos and
scanned
images in nearly all image formats and PDF files.
The ExifTool
provides a very powerful tool to read metadata from an entire folder of
JPG images - or any set of folders and subfolders of digital files -
into a CSV file, which is easily imported to Excel. In the Excel
file, incorrect or missing metadata of each file/record/image can be
fixed. That Excel file can be used to import this "inventory
of digital assets" into digital library software (Greenstone), a
database or a Collections Management System (CMS). It can also be
used to "write" the updated metadata back into the image (or
other digital files). Although the ExifTool must be used from Windows
(or Linux) through the "command line", which may be daunting
for users accustomed to a graphical interface, its power to create
archive/collections inventories - and files with useful embedded
metadata - should justify the steps necessary to master its use.
Highly recommended!
Google
announced on February 12, 2016 that Picasa, its desktop photo editing
and management program, would not be supported after March, 2016.
The Picasa Web Albums, the online feature of this program, would
transition to Google Photos.
This
webpage mentions using Picasa for basic photo captioning and metadata
tagging, including location tagging. "Desktop" Picasa
will function indefinitely for this use. Software
("app") program recommendations will be updated as
replacements become known.
This guide's sections
are:
1.
ExifTool - Reading
and Writing Embedded Metadata
a.
More Complex Directories with
Thousands of Photos
b.
Writing Metadata into Photos
2. ExifToolGUI
3.
Summary of the ExifTool and ExifToolGUI
a.
Videos
b.
Recommendations
1.
ExifTool - Reading
and Writing Embedded Metadata
Phil Harvey's ExifTool, is described to have the ability to
extract, add, copy or move nearly all types of metadata, not only EXIF
metadata. It will display
metadata in PDF, Word, Excel and MP3 files and edit metadata in image
and PDF
files. The basic
program is used from a "command line", but with the correct
configuration, it is very powerful and has proven to "do
everything" to image metadata. Downloads for Windows, Macs and
Linux systems and very complete explanation of its
functions are here.
This webpage is an introduction to using
a few of the command line functions.
Download and install as follows:
A. Go to Phil
Harvey's website and use one of the download links near the top of
the page. The "Windows Executable" is recommended for
Windows systems and there is a Mac OS X package just below.
B. Installation
instructions are on a link just below the download links. On
Windows systems, follow the "exiftool.exe" move instructions
carefully so the program will work from all directories.
C.
As noted in these instructions, you must first get to the Windows
command prompt by selecting "Run..." from the Windows
"Start" menu, then type "cmd" and press Return. It
appears that you
have time-traveled to the '80s world of DOS! Then type "exiftool".
D. The "exiftool" expects arguments/inputs otherwise it
will only display information about the program. This is a sample
command:
exiftool -csv -r
-DateTimeOriginal -Description
-Subject e:\cars\Vespa\Vespa-Pics > Vespa.csv
Figure
1 shows what this looks like:
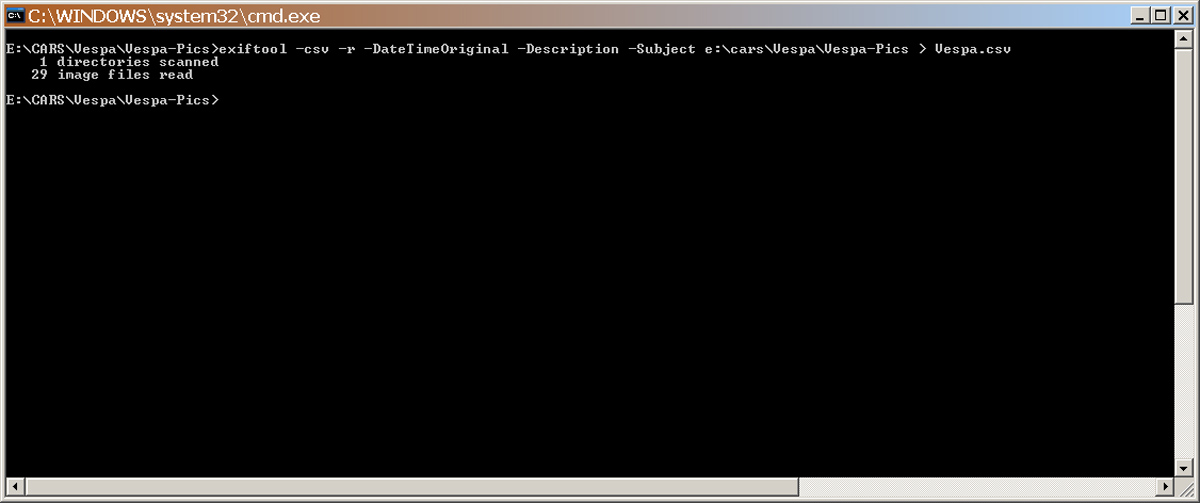
Figure
1 - The ExifTool in a Command Window
which
gives the result in Figure 2, below. The "inputs",
above, to the tool are:
1.
"-csv"
set the option to produce a "Comma Separated Value" file. This
format can be directly read by Excel.
2.
"-r"
do this recursively (for all files in the chosen directory)
3.
"-DateTimeOriginal"
write the
metatag "DateTimeOriginal"
4.
"-Description" write the
metatag "Description" which is the Picasa caption on the
image
5.
"-Subject" write
the metatag "Subject", which is a Picasa
"tag". Multiple tags can be added in Picasa
6.
"e:\cars\Vespa\Vespa-Pics" do this
action for all the files in this directory
7.
"> Vespa.csv" sends the
output to the CSV named file
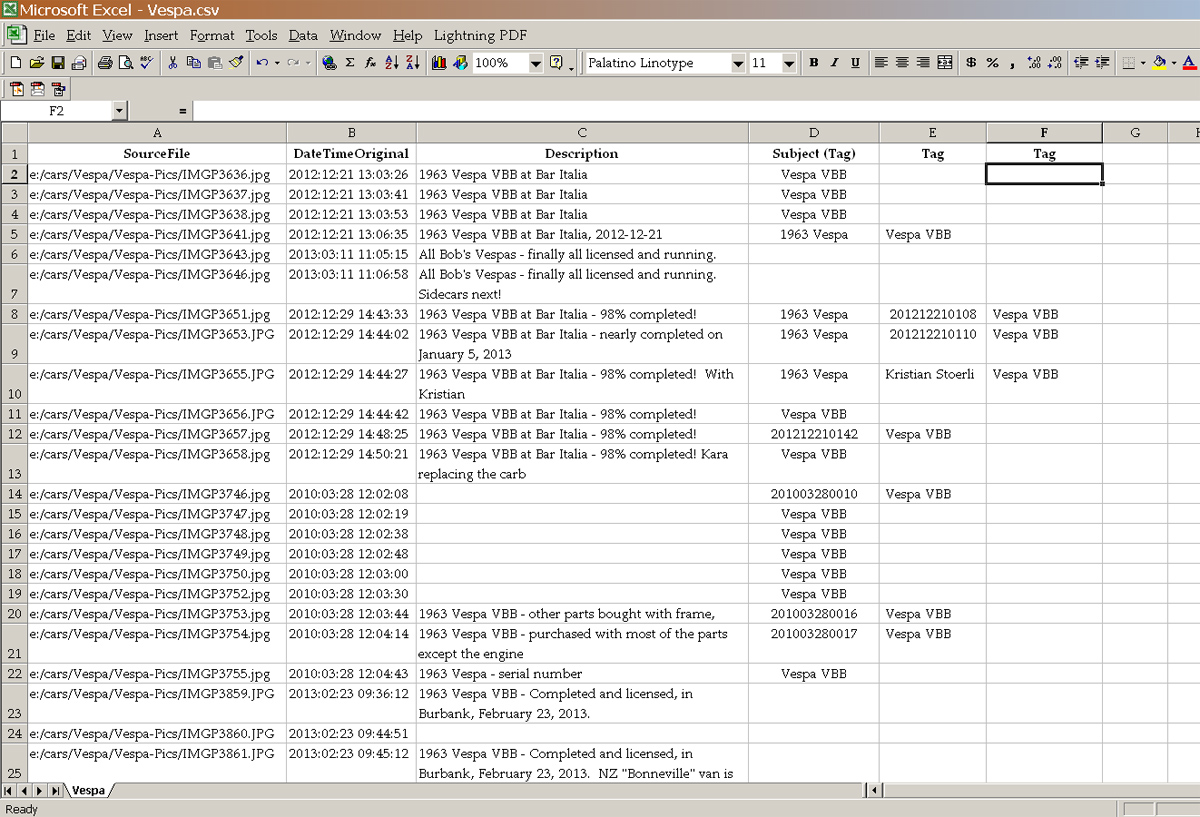
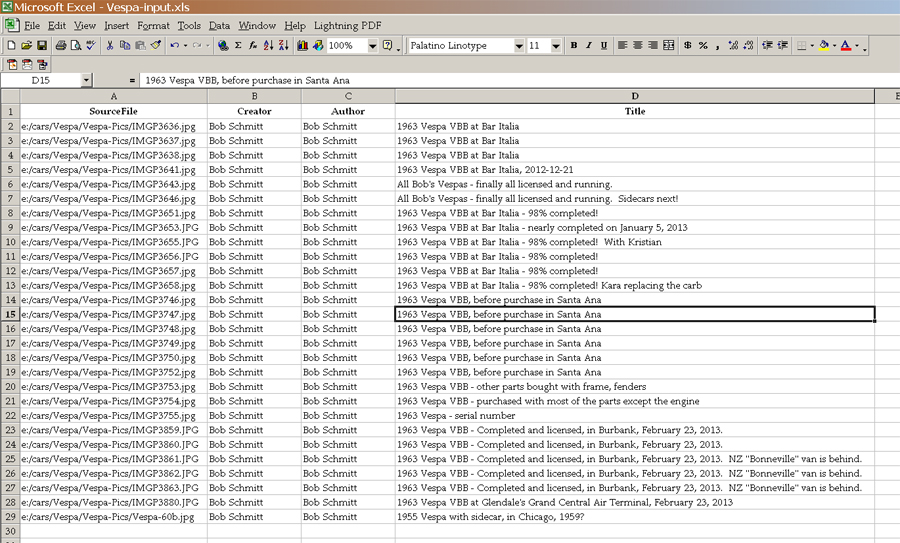
Figure
2 - the Excel file output from the Vespa.csv file
8. If the CSV file
is opened with Excel, it will appear similar to the one above.
The columns and headings have been formatted to improve
readability. The "Subject" field column will have
multiple "tags" separated by commas. Highlight the
entire column and use Excel's "Text to Columns" function in
the "Data" menu and choose "delimited" separation
and check the "comma" box. Sort the 'tags"
columns one at a time to group similar data together - such as the ID
numbers and move them to the relevant "correct"
column.
9.
If you will be using ExifTool on a regular basis, you can keep a
"library" of commands in a Word or Excel file that can be
copied and pasted into the command Window. To copy or paste,
right click in the title bar of the command window and choose
"Edit". Options will pop up, including
"Paste". To adjust the appearance of the command
window, choose the "Default" menu item and make desired
changes.
For
example, "a." below is the original example command;
""b." will produce a similar file from the "Vespa-VBB"
directory, but add the "FileName" to the "Vespa-VBB.csv"
output file.
a. exiftool -csv -r -DateTimeOriginal -Description
-Subject e:\cars\Vespa\Vespa-Pics > Vespa.csv
b. exiftool -csv -r -FileName -DateTimeOriginal
-Description
-Subject e:\cars\Vespa\Vespa-VBB > Vespa-VBB.csv
Complete
documentation for the ExifTool is on Mr. Harvey's
website. The program may seem complex, but it is potentially powerful. There are many metadata categories,
with many options to
read and extract data from files. However, it you have
an extensive photo collection,
or similar files to manage, much benefit can be gained by "reading" selected
metadata from the files, as shown above, and creating lists in Excel or
other database program.
These
are the XMP metadata values in the "Dublin Core" category that the ExifTool can read and
modify; there are many more categories and hundreds of metadata values:
Tag
Name
|
Writable
|
Contributor
|
string+
|
Coverage
|
string
|
Creator
|
string+
|
Date
|
date+
|
Description
|
lang-alt
|
Format
|
string
|
Identifier
|
string
|
Language
|
string+
|
Publisher
|
string+
|
Relation
|
string+
|
Rights
|
lang-alt
|
Source
|
string/
|
Subject
|
string+
|
Title
|
lang-alt
|
Type
|
string+
|
These
are the metadata values in PDF files that the ExifTool can read and
modify (XMP category):
Tag
Name
|
Writable
|
Author
|
string
|
Copyright
|
string/
|
CreationDate
|
date
|
Creator
|
string/
|
Keywords
|
string
|
Marked
|
boolean/
|
ModDate
|
date
|
PDFVersion
|
string
|
Producer
|
string
|
Subject
|
string/
|
Title
|
string/
|
a. More Complex Directories with Thousands of Photos
The
example above used a single directory with a small number of files that
have been prepared with significant metadata, How does the
ExifTool work with a complex folder/directory with many subdirectories
and thousands of photos?
This
ExifTool command (from the command line) was used (from the command
line) on the "AFNpics" (photos of Frazer Nash cars) directory
which had 53 subdirectories and an unknown number of photos/files before
its execution. As an experiment, the
command was first used with the "All" parameter:
exiftool
-csv -r -All f:\AFN\AFNPpics
> AFNPics.csv
1046 categories of metadata were
returned! More than 95% of these categories were "camera/photo
technical type" data, with many category variations from different camera
manufacturers of the
same basic data. The CSV output
file had far too many columns to display
in Excel.
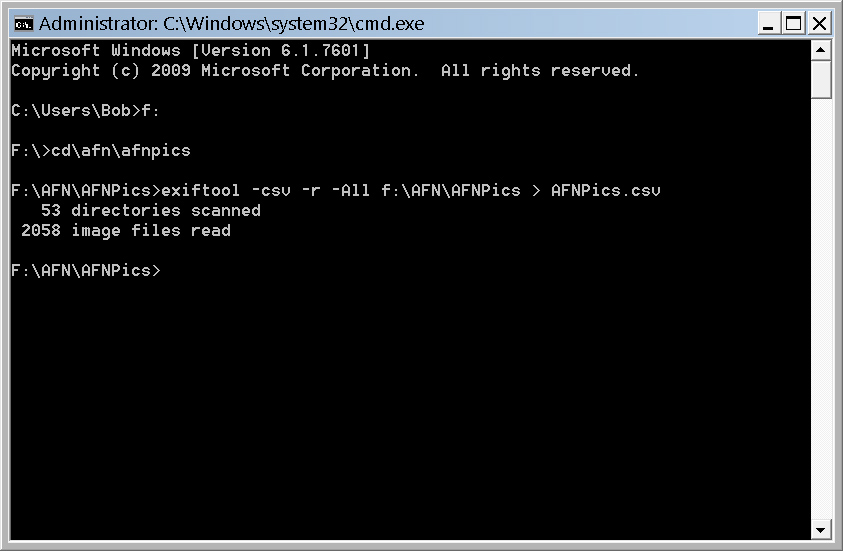
Figure
2a -
Command to run the ExifTool with the "All" parameter.
Note it has "scanned" 53 directories and extracted data from
2058 image files.
To get more
useful results, the metadata categories were
trimmed down to 43. This command below is the result:
exiftool
-csv -r -Artist -Author -Caption-Abstract -Categories -Category
-Comment -Comments -Company -Contributor -Copyright -Coverage -CreateDate
-CreationDate -Creator -Date -DateCreated -DateTimeOriginal
-Description -Directory -DocumentID -FileID -FileName -FileNumber -FileSize
-FileSource -FileType -Format -GPSLatitude -GPSLongitude -ImageHeight
-ImageSize -Keywords -Label -Location -ModifyDate -ObjectName -PDFVersion
-Producer -Relation -Source -SourceFile -Subject -Title f:\afn\afnpics
> afnpics4.csv
When it
was executed, it produced a very useful Excel file, after some formatting for better display.
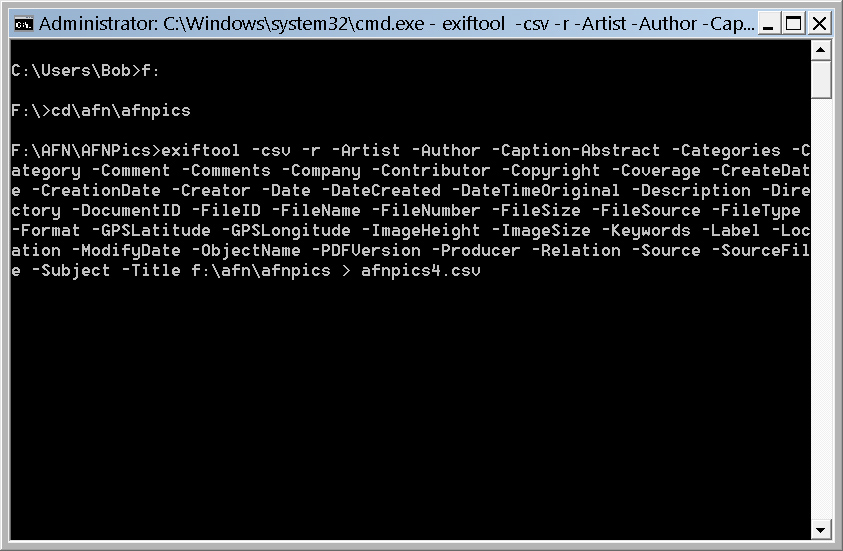
Figure
2b -
Command to run the ExifTool with a trimmed down group of 43
parameters. Not all parameters produced useful data.
The screen shot
in Figure 2a shows there are more than 2000 photos in the entire "AFNPics" directory.
After running the command shown in Figure 2b, the result was an Excel file with
43 columns and 2058 rows. From this file, it's
easier to pick out the more useful categories, delete the columns with
no data (or data not considered useful) and start adding data in the
empty cells!
b. Writing Metadata into Photos
The
ExifTool also has the ability to "write" metadata to single
files or entire directories. This
is a preliminary guide to this "-tagsFromFile" option:
1.
Extract the metadata from your photos by making a CSV/Excel file as described in section
D, above.
2.
Inspect the cells for each photo's metadata in the in the relevant rows and columns.
3.
After deciding what needs to be added, fill in the desired metadata in
the appropriate cells. The Excel "copy" and
"paste" functions can speed this process.
4.
You can optionally delete rows and columns that have no new data to be
added to the photos or for photos that are not to be changed. In
our example from above, the "Description" column/metadata was
changed to "Title" and missing data filled in. New
columns were added for "Creator" and "Author".
The Excel file below was saved in "CSV" format.
5.
When saving the Excel file planned for input in the "CSV"
format, it's a good idea to
use a new file name, such as "Vespa-input.csv", to prevent confusion with the CSV file which
extracted the metadata from your photos.
6.
Open a Command window (see step C above) and change to the drive and
directory where your photo to be changed are located.
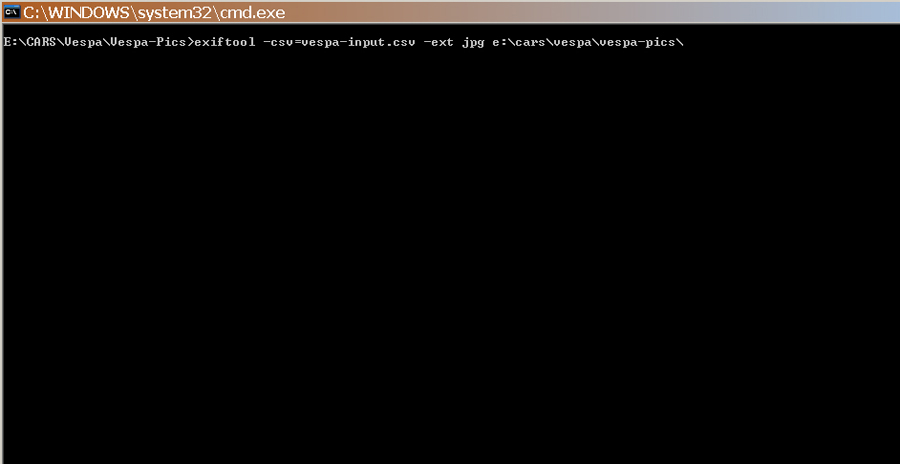
7.
Run a ExifTool command similar to this:
a. exiftool -csv=vespa-input.csv -ext jpg
e:\cars\vespa\vespa-pics\
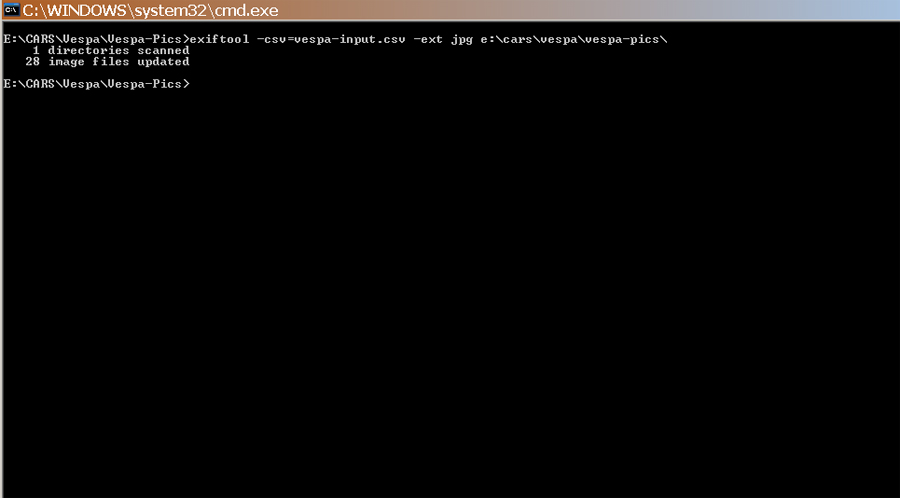
8. When the command runs
correctly (no error messages), the new metadata will be added to the chosen
photos and the original photos will be saved with the "_original"
extension added - just in case! If you get error messages, check
your input file to make sure the full path to the "SourceFile"
category is all
lower case and the cases of the file names match. If the command
still fails to execute, change the output
path to lower case. For example from above, it should be "e:\cars\vespa\vespa-pics\"
This
is a screen
shots of this command before running:
And
the result after running - not overly dramatic!
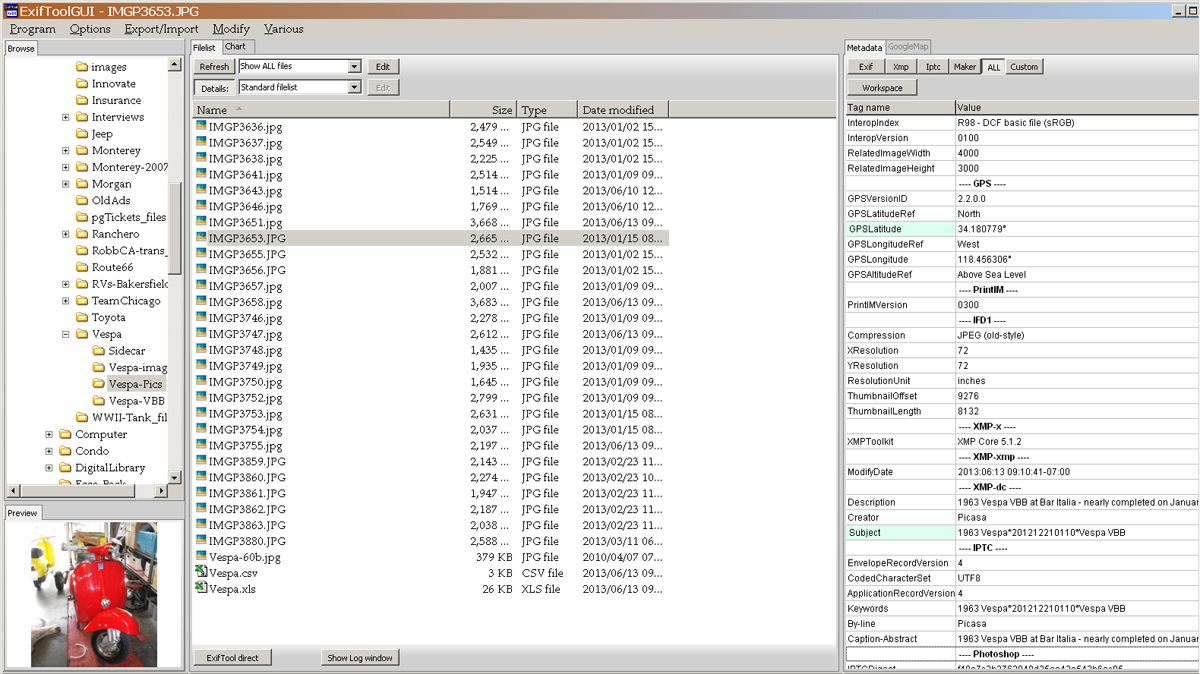
See Figure
3a below for a screen shot of the ExifToolGUI after this operation.
In October, 2014
this "write" function was used (from a CSV file) to add 14 categories of
metadata to 675
travel photos. This included a unique accession number for each photo.
See the "Videos" section below for more
detail. Very useful and impressive!
The ExifTool
has another function to add geo-data to digital photos using a track
recorded on a GPS. The function was tested in early December,
2014 with great success. Although the mapping accuracy depends
on the camera time and date setting be the same as on the GPS device,
the photo date and times can be adjusted in program such as Picasa or
a sync parameter can be used directly in the ExifTool. See the
full
"Geotagging
with ExifTool" documentation.
2. ExifToolGUI
If
using the command line for ExifTool seems too "technical" (it
can daunting the first few times of use!), developer Bogdan
Hrastnik has written a GUI (Graphical User Interface, Windows only) for ExifTool, which
allows very easy access to many of the ExifTool functions.
The "how to" page for ExifToolGUI is here and
you can download the zipped file here.
A.
Figure
3 below shows the ExifToolGUI open on the same directory of Vespa photos
used for the example above before new data was added from an Excel file.
Figure
3 - ExifToolGUI
open on the "Vespa-pics" photos directory. Note the output files from the
prior example also appear.
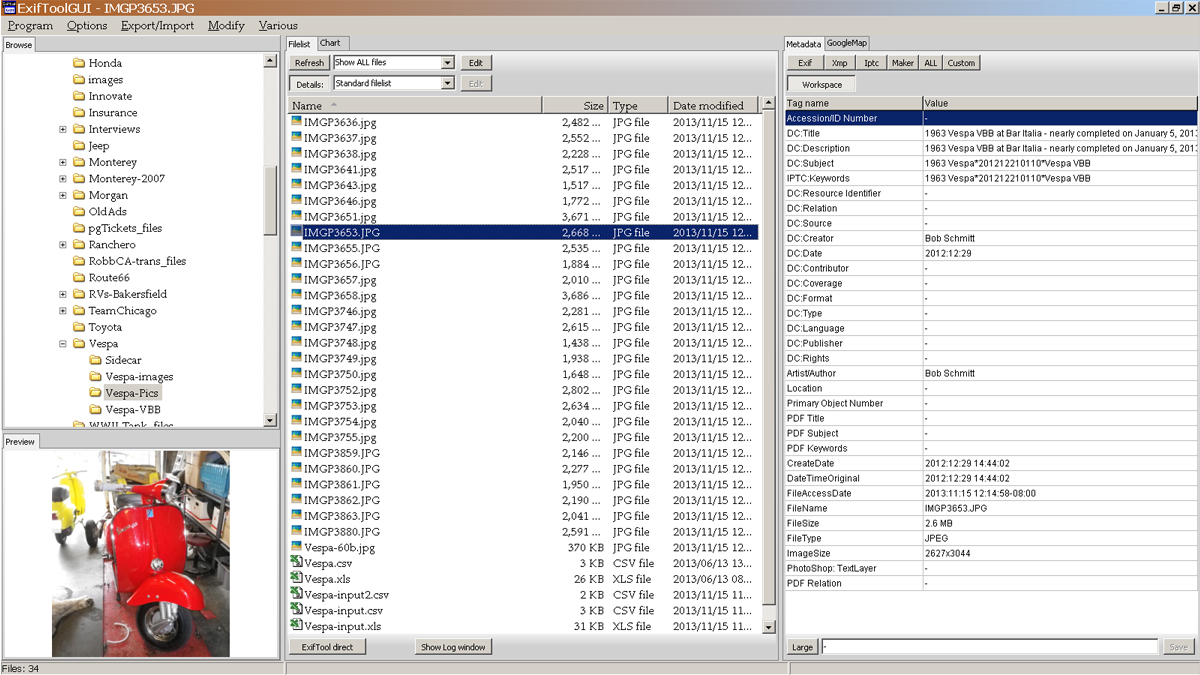
Figure
3a -
The ExifToolGUI open on the "Vespa-pics" directory after an Excel file was used to "write" metadata
into each photo. The "Workspace" tab shows the
new Title, Author and Creator data files from the
prior example also appear.
B.
This
program is an excellent starting point to understand how much metadata
is contained in digital files, especially digital photographs.
All
digital files contain metadata: Word, Excel, MP3, video, etc. files can
be examined and lists of these files can be created, as shown in section
1. above. One step towards reducing chaos!
The
panel on the right of the screen offers tabbed choices to examine
specific metadata categories. "All" has been selected.
Note the metadata in the "XMP" category and the IPTC category
show the metatags that are the same in the prior example, although the
metadata sub-categories have different names.
C.
The
GUI has a function to add or modify metadata to a single file or group of
files. This is done in the "Workspace" tab of the same
right panel. Chose a category to add new data and type in the new
data in the window at the bottom of this panel. When
complete, press the "Enter" key and click on the
"Save" button.
The
metadata categories for editing in the right panel's "Workspace Manager"
can be customized, but must be setup. The desired
categories/options
are created and saved in a "ini" file: "ExifToolGUIv5.ini"
It
can be slightly tedious to setup a Workspace Manager. The ".ini"
file can be edited directly in a text editor (Notepad). Below is a
sample of the Workspace tags section - not the full "ini" file
- from an "ini" file for common
operations:
[WorkspaceTags]
Accession/ID
Number=-Identifier^Accession or ID Number
DC:Title=-Title^DC
Title (name of object)
DC:Description=-Description^DC
Description
DC:Subject=-Subject^DC
subject
IPTC:Keywords=-IPTC:Keywords^Keywords/tags
(use comma)
DC:Resource
Identifier=-Identifier^DC Resource Identifier
DC:Relation=-Relation^DC
Relation (to primary object)
DC:Source=-Source^DC
source (is part of)
DC:Creator=-Creator^DC
creator
DC:Date=-Date^DC
date
DC:Contributor=-Contributor^DC
contrib
DC:Coverage=-Coverage^DC
coverage
DC:Format=-Format^DC
format
DC:Type=-Type^DC
type
DC:Language=-Language^DC
language
DC:Publisher=-Publisher^DC
publisher
DC:Rights=-Rights^DC
rights
Artist/Author=-Author^Bob
Schmitt
Location=-Location^Where
created
Primary
Object Number=-XMP:Relation^Relation to primary Object
PDF
Title=-pdf:Title^Document title
PDF
Subject=-pdf:Subject^Document subject
PDF
Keywords=-pdf:Keywords^Document keywords
CreateDate=-exif:CreateDate^[2012:01:14
20:00:00]
DateTimeOriginal=-exif:DateTimeOriginal^[2012:01:14
20:00:00]
FileAccessDate=-FileAccessDate
FileName=-FileName
FileSize=-FileSize
FileType=-FileType
ImageSize=-ImageSize
PhotoShop:
TextLayer=-TextLayerText^Copyright
[TagList]
The newly
customized "ExifToolGUIv5.ini"
can be copied and transferred between computers. This could be
useful to set up a workgroup which will contribute to the metadata for an archive.
D.
The GUI can also run ExifTool commands, as in 1.D., above, by clicking
on the "ExifTool direct" button at the bottom of the middle
panel. If the file output goes to a screen "log" instead of
being written to a file, copy the entire log (Ctrl-A, then Ctrl-C) and
paste it into an open spreadsheet (Ctrl-V).
For a further
trial with a
different directory of images, the ExifToolGUI was used to
embed "captions" and an
"ID number" in each image. This
was done in the "IPTC edit function" window. These images
were then brought into a new Greenstone collection, titled
"Vespa" and the (new) captions were extracted
from the "IPTC.Caption-Abstract" metadata item. The
trial ID numbers were extracted and displayed from the "IPTC.ObjectName"
metadata category.
However, since this 2013
trial, the widely-accepted standard
"accession number" format is now used for the ID
number. In the second photo below, this would be
"2012.9.1" - the first photo in the 9th month of 2012.
The "DC:Identifier" category is the standard now used for the
accession number.

Figure
4 - Note the file now has "Object ID", added by
by using the "ExifToolGUI". This
screen shot shows browse results on "Alternate Captions" starting with "1".
The "Alternate Caption" is from "IPTC.Caption-Abstract" and the "Caption" is from "XMP.Description",
as described above.
The
ExifTool and ExifToolGUI will display and edit the metadata for many
file types. PDF files, Word and Excel documents, music and video files all
have embedded metadata. Check your files and you may be surprised!
In a
further example, the
screen shot below (Figure 5) shows the particular metadata embedded in these test
images, extracted by ExifTool from the command line, through the GUI. Note the "SourceFile"
shows that these are image files in a Greenstone digital library collection.
Although
there are only image (JPG) files in this sample directory, this GUI function
shows the file name and metadata (if correctly specified) for
all files. This is a handy way to make a list in CSV, then in Excel,
to annotate or mark files for further action.
From this
type of list, the photo unique ID - here "ObjectName" - can be reviewed
and updated if desired. The FAQ on the ExifTool website, under question
13, shows examples
of using the command parameters to make this export.
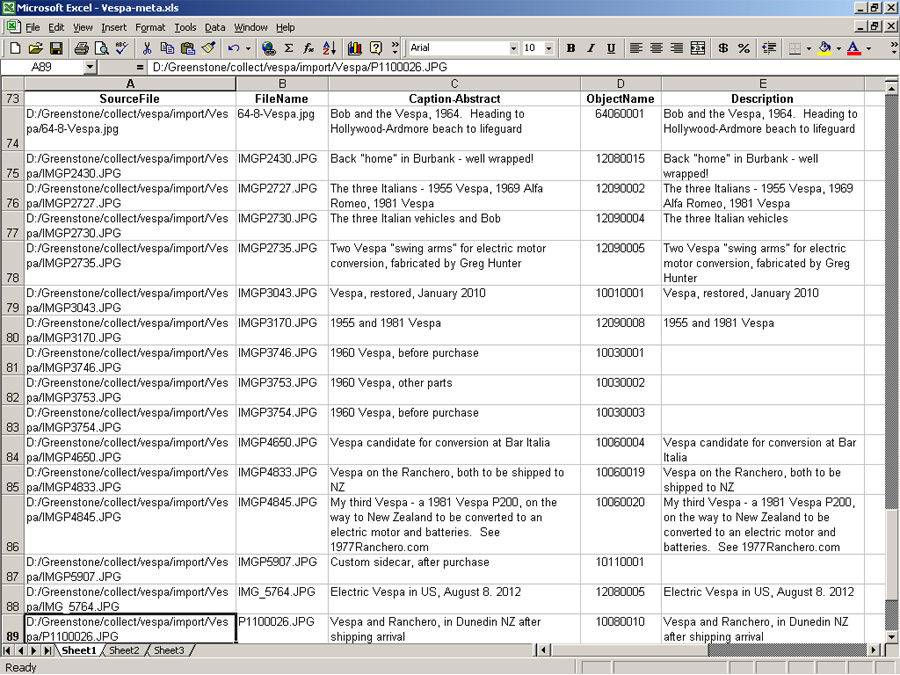
Figure 5 - The
ExifToolGUI was used to request a list of the "FileName",
"Caption-Abstract", "ObjectName" and
"Description" metadata from a single directory. This is
only a small subset of the metadata in any digital image.
The ExifToolGUI
was used to correct a few old captions embedded by Picasa.
3.
Summary
of the ExifTool and ExifToolGUI
The ExifTool
ability to add and/or replace specific metadata in images
(and other file types) with new data from a CSV file (a standard file type export from
Excel) is VERY useful. To conform to "best museum
practice", an accession number as a "unique ID" can be very easily added
as a column in the Excel table (as above), which is "saved as" a CSV file and
then used to update a full directory of images.
Another
ExifTool function can copy each
image's metadata from one category to another, when the program is used from the command
line. This may be the
solution to add metadata to images that can copied/transferred from/to other
metadata descriptors, making those files conform
to any "standard".
The
ExifTool and ExifToolGUI promise to be a powerful combination to improve
embedded metadata of digital images. I use these tools (also with Picasa) for my collections and archives, primarily with the Greenstone digital
library software, as discussed on other
webpages.
a.
Video
We've made an introductory video guide
on
YouTube for the downloading, setup and basic operations of the ExifTool and ExifToolGUI (also:
http://youtu.be/CB6F19zRqSw).
A second video
on YouTube explains the steps for reading the metadata to an Excel file
from a directory with hundreds of photos. adding metadata in the Excel
file and then writing it back to the same group of 650+ photos (also: http://youtu.be/T4gTQEwUwwY).
These are the
ExifTool commands used in the video to read the data from the "England-2014"
directory:
exiftool -csv -r -Caption-Abstract -Coverage -Creator -Date -Description -FileType -Format -Identifier -Keywords -Location -Relation -Source -SourceFile -Subject -Title
f:\england-2014 > england-2014.csv
After metadata updates
were made in Excel, this command wrote the new metadata into the
photos:
exiftool -csv=england2014-input.csv -ext jpg
f:\england-2014
It really works!
You can use these commands directly if you change the red italic file
names and locations to your file locations and names.
b.
Recommendations:
1. Use the
ExifTool from the command line to read entire folders/subfolders of
photos.
2. Review
the resulting Excel file ("save as" from the CSV output file)
to determine which metadata categories will help organize these
collection assets. The Dublin Core categories should have high
priority.
3. Use the
Excel copy/paste functions to fill in missing metadata. Use the
Excel "data fill" command to create accession numbers in the
DC:Identifier category.
4. Use the
ExifTool from the command line to write the Excel file ("save
as") to the CSV format and then back to the entire set of photo folders/subfolders.
5. The ExifTool
may be used again at any time from the command line to read the
metadata-updated photo folders/subfolders, creating "data-rich" Excel
files for import into a collections management, content management or
digital library (e.g. Greenstone) software program.
This
review of the ExifTool is frequently updated as we gain experience with these
very useful tools.
Email me with any comments, suggestions or questions! Bob Schmitt, rgschmitt@gmail.com
December 1, 2014
Revised
February 15, 2016
|
|